




Windows dominates the desktop space. StatCounter pegs its global market share at 77 percent as of April 2020. That is a massive chunk of computing power. Most of those users are on Windows 10. Some are still clinging to Windows XP. For casual users, the specific version rarely matters. As long as the browser loads and the document saves, life is good.
But there is a catch. Old software rot.
Using an outdated operating system exposes you to significant security vulnerabilities. Microsoft stopped supporting Windows 7 in January 2020. Support for Windows 8.1 ends on January 10, 2023. If you are still on those platforms, you are flying without an autopilot. You need to know what you are running. You need to decide if an upgrade is urgent.
The quickest way to find out exactly what OS lives on your machine is to use the winver command. It takes seconds. It requires no internet connection.
Why Checking Your Windows Version Is Critical
You might think your antivirus handles everything. It doesn’t. Modern threats exploit unpatched system files. If Microsoft isn’t providing security updates for your specific build, that antivirus is just a heavy coat of paint on a crumbling wall.
Knowing your version helps you decide your next move.
- Windows 10: You are likely safe, assuming updates are installed.
- Windows 8.1: You have a countdown clock. Support ends soon. Plan the upgrade.
- Windows 7: You are in the danger zone. No new security patches are coming.
The winver tool strips away the guesswork. It opens a small dialogue box titled “About Windows.” This isn’t just a splash screen. It delivers three critical data points.
- The version of Windows: Is it 10? 8? 7?
- The build number: This tells you how up-to-date your current install is.
- Service pack status: For older systems, this indicates if major cumulative updates have been applied.
Why does the build number matter? Because two machines can both say “Windows 10” but be months apart in security fixes. The build number reveals the true state of your system’s defenses.
“Considering Microsoft ended support for Windows 7 in January 2020, there is no time like the present to check the version of Windows your computer is running.”
This isn’t about chasing shiny new features. It is about closing doors that hackers are currently kicking down. If your winver output shows an end-of-life version, don’t ignore it. The clock is ticking. Start planning the migration. The alternative is gambling with your data. And the house always wins.
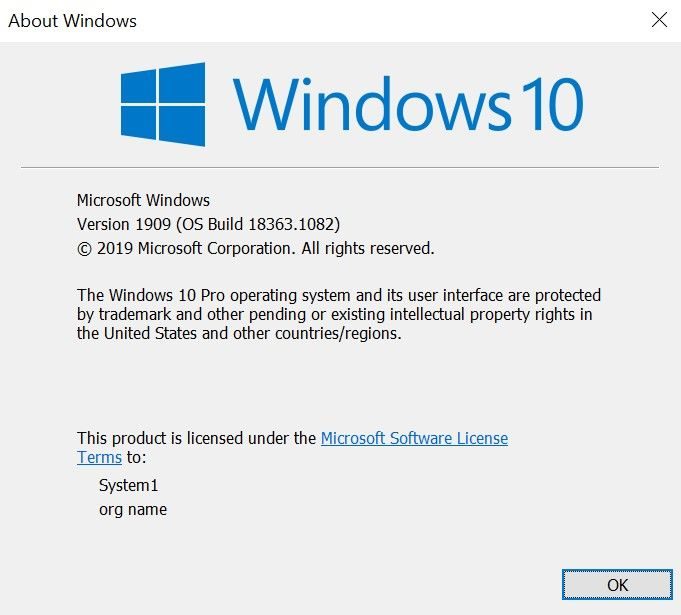
The winver command remains the fastest way to verify your build. Type it into the Start menu search on Windows 7 or newer. Older systems? You have to open the Run dialog first. It’s a minor friction point for legacy machines.
But sometimes you need more than just a version number. You might need build specifics or activation status. That’s where the settings menu comes in. The path to that data shifts depending on which iteration of Windows you’re running.
Windows 10 Settings Path
Start by clicking the Windows logo on the taskbar. Look for the gear icon in the bottom-left corner. Click that to open Settings.
Select System. It’s usually near the top.
Scroll down the left-hand column and pick About. It’s the final option in that list.
Here you get a full breakdown. The page splits into Windows specifications and Device specifications. Under Windows specifications, you see the edition, version, and OS build. You also get the installation date. This data mirrors the winver output but adds context.
The Device specifications section lists the processor, RAM, and system type. You’ll also find the Device ID and Product ID here. These identifiers matter for support tickets or enterprise management.
Windows 8 Settings Path
Windows 8 tries to bridge the gap between mouse and touch. If you have a touchscreen, swipe in from the right edge. If you’re using a mouse, hover over the bottom-right corner.
Click the Settings gear icon.
Choose Change PC settings.
Navigate to PC and devices on the left. Then select PC info.
The layout here is simpler. You get two main sections: PC and Windows.
The PC section mirrors the Device specifications from Windows 10. It lacks the Device ID, though. It covers the hardware basics.
The Windows section tells you the edition and whether the OS is activated. It’s less detailed than the Windows 10 About page but gets the job done for quick checks.
Windows 7 Settings Path
Click the Start button on the left side of the taskbar. Type Computer in the search box.
Right-click the Computer icon under Programs.
Select Properties from the context menu.
This opens a window with a list of key details. You see the Windows edition and activation status right at the top.
Below that, you get system specifications like processor speed and installed memory. The window also displays the computer name, domain, and workgroup settings. It’s a straightforward list. No graphical fluff. Just data.
What About Mac Users?
Apple doesn’t run Windows natively. But you can install Windows 10 on compatible Macs using Boot Camp Assistant.
Users who switch between macOS and Windows know their environment. They’re booting into a different OS entirely. So they likely already know which version they’re running.
Still, the same rules apply. If you’re troubleshooting a specific feature or security patch, you need the exact build number. The winver trick works there too. Settings menus differ slightly depending on the virtualization layer you’re using, but the core logic holds.
Knowing your version isn’t just for pride. It determines driver compatibility. It dictates security updates. It matters when you’re trying to run legacy software.
The interface changes, but the need for precision stays the same. You click the right button. You find the right number. You move on.